Integrating APEX and US. Postal Services Web Tools API - Part 1 - #JoelKallmanDay
Introduction
A common requirement in APEX applications, big or small, is to capture address information. Address information is notoriously hard to deal with due to the variety of ways to enter an address and the fact that addresses are constantly changing. The good news is there are tons of services that provide APIs for address validation and cleansing, the better news is that my favorite Oracle APEX feature, declarative REST Data Sources, makes it easy to interact with modern REST services in matter of minutes with little to no-code needed!
In this post, I will outline the steps to validate an address using APEX REST Data Sources and the USPS Web Tools API for Address Validation, which is provided FREE of charge by the US. Postal Service.
Reasons for using USPS Web Tools over other services is that USPS validated addresses are guaranteed to be deliverable and the API returns additional fields to help identify the correct address for apartments, suites, and includes other information such as ZIP+4 extension, or if an address is vacant or considered a business, to name a few.
Assumptions:
- You need to validate addresses in the United States or Puerto Rico.
- You are on APEX 18.1+ or later
- I use APEX 20.2 for these examples, so some screenshots may not lineup exactly with your environment.
- You have the DBA access to configure an ACL, or a DBA to run the script for you.
- You are at least a little familiar with adding components in the APEX Page Builder.
This blog post is in remembrance of Joel Kallman and my first ever publicly promoted post, which I hope helps to further the collective knowledge of the Oracle community and aids fellow APEX developers build their next greatest app. In the coming weeks I hope to supplement this article with additional tips and tricks for working with this API as well as other Geocoding services. My recent projects have required working with address information and I have tons more notes to share with y'all. :)
Step 1. Register and read the the Terms and Conditions
Registration is easy and only takes a couple of minutes to fill out some basic information about yourself and optionally how you expect to use the APIs.
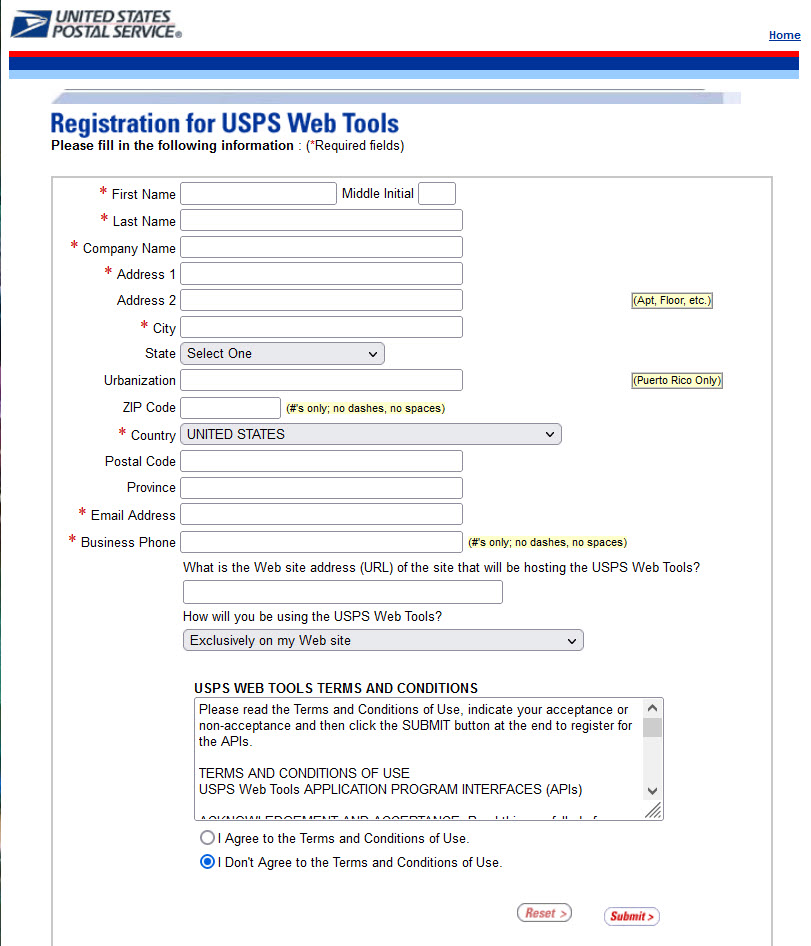
Within a few minutes, you should get a registration confirmation email with your API credentials and additional information including a list of APIs you're allowed to access, the production URL to access USPS Web Tools Servers, and next steps to begin using the Web Tools.
Don't skip over the Terms and Conditions! There are a few important guidelines to follow that I will summarize, but there may be others that affect you.
USPS data can only be used to facilitate USPS shipping transactions.
APIs should only be used on a transactional basis, batch cleansing of a database is not allowed.
Your credentials should not be packaged in any code intended for resale or distribution to others, basically don't share your credentials.
Step 2. Read Review the docs
I'll cover the basics here, but the APIs are well documented with examples for several use cases and detailed information about the data returned that is important for all developers to know.
There are two main sources of documentation. The Step-By-Step Instructions provide important information applicable to all available APIs, while the individual API User's Guides for each API include specific technical details and explain each API in detail.
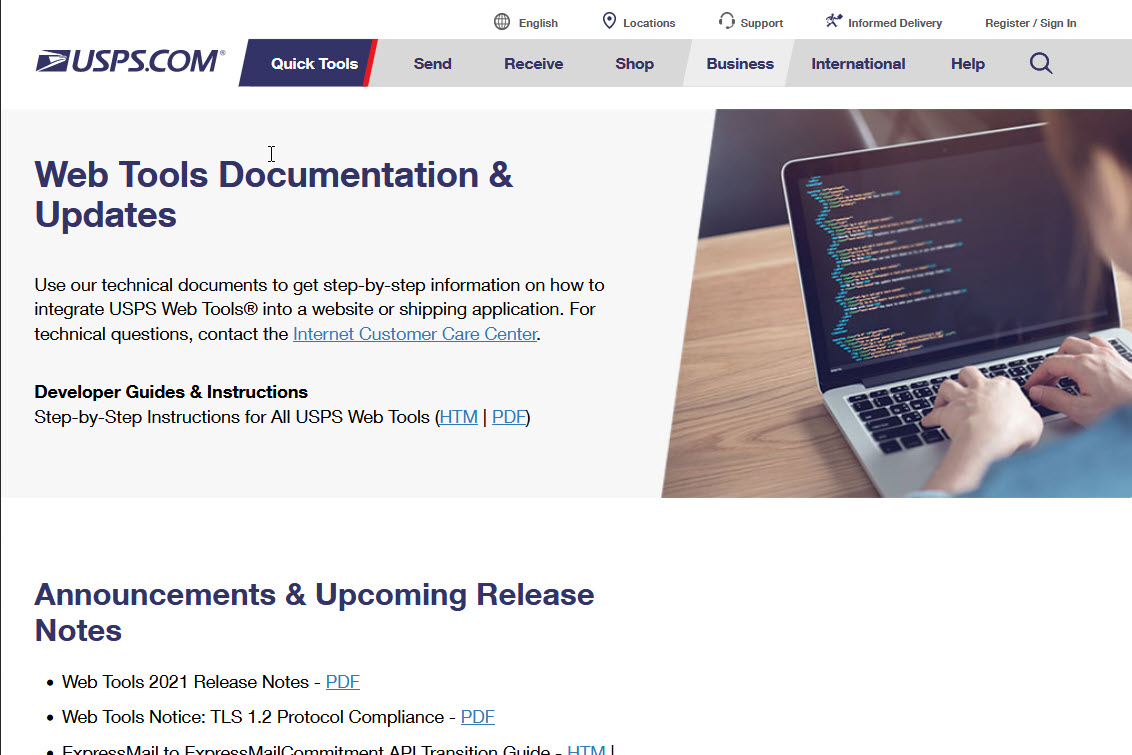
All of the docs are available here: https://www.usps.com/business/web-tools-apis/documentation-updates.htm
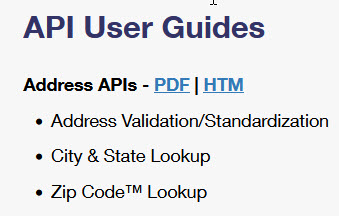
For this post, I'll mostly refer to information from the Address Information API User Guide: https://www.usps.com/business/web-tools-apis/address-information-api.htm
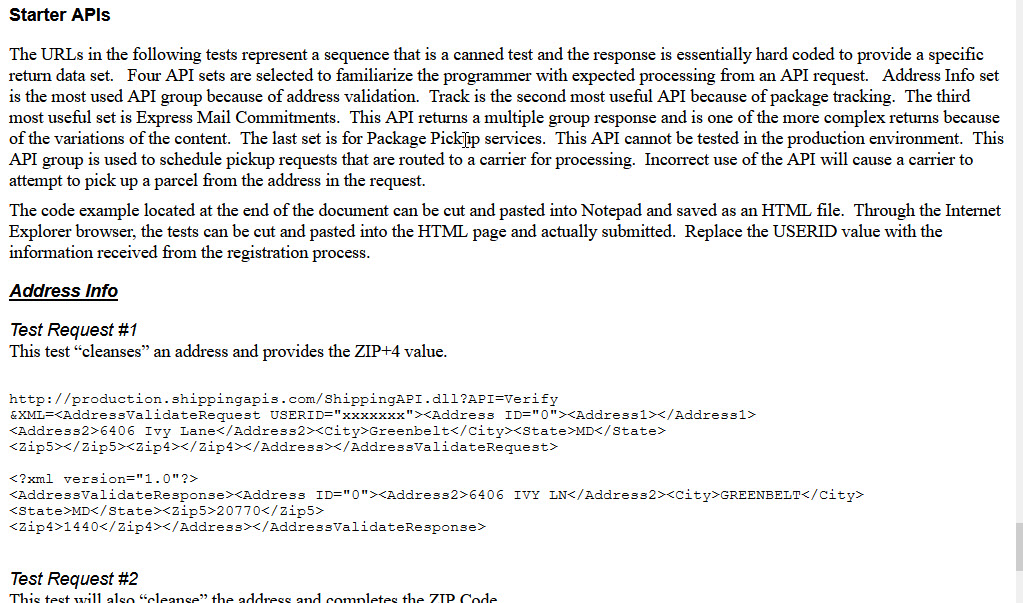
For list of Starter APIs and samples of test requests, see here: https://www.usps.com/business/web-tools-apis/general-api-developer-guide.htm#_Toc24631965
What we cover in this article is essentially Test Request #1, but instead of manually building the XML, making a request to the URL, and then parsing the XML response, we will leverage REST Data Sources and Dynamic Actions to work some APEX magic.
By now, you should have a couple of details we'll use next:
- Your API credentials
- The production URL: https://secure.shippingapis.com/ShippingAPI.dll
Step 3. Configure an ACL to allow accessing the API URL
For APEX on Autonomous Database, run this as the ADMIN user, don't forget to set the principal_name parameter to your application's schema:
BEGIN
DBMS_NETWORK_ACL_ADMIN.APPEND_HOST_ACE( host => 'secure.shippingapis.com', ace => xs$ace_type(privilege_list => xs$name_list('http'), principal_name => '<YOUR APPLICATION SCHEMA>', principal_type => xs_acl.ptype_db));END;For other configurations, you may also need to configure an SSL wallet before you can connect. There are several guides available on how to set one up, check this one out by Adrian Png: https://fuzziebrain.com/content/id/1720/
Step 3. Create a new REST Data Source in an existing APEX app
Assuming you already created an APEX application, follow these steps:
- In your APEX app, go to Shared Components > REST Data Sources, click Create >.
- Click Next > to create From Scratch.
- Enter General details.
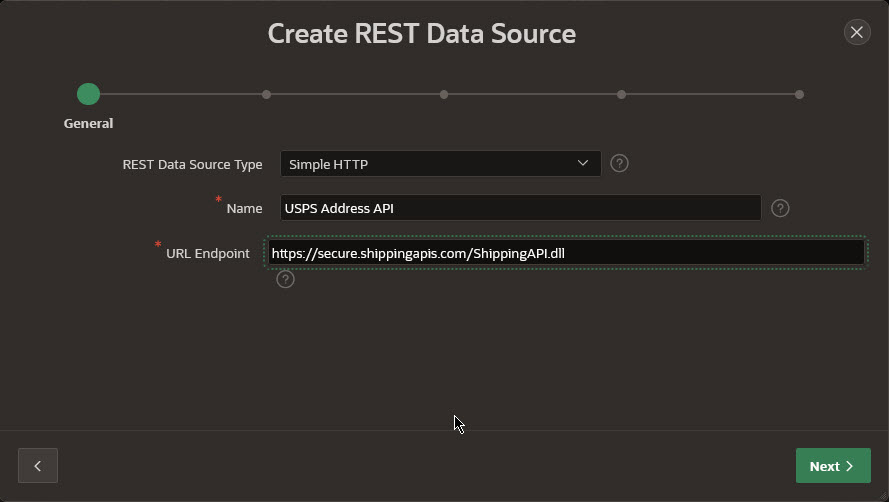
- REST Data Source Type: Simple HTTP
- Name: USPS Address API (can be whatever you want)
- URL Endpoint: https://secure.shippingapis.com/ShippingAPI.dll
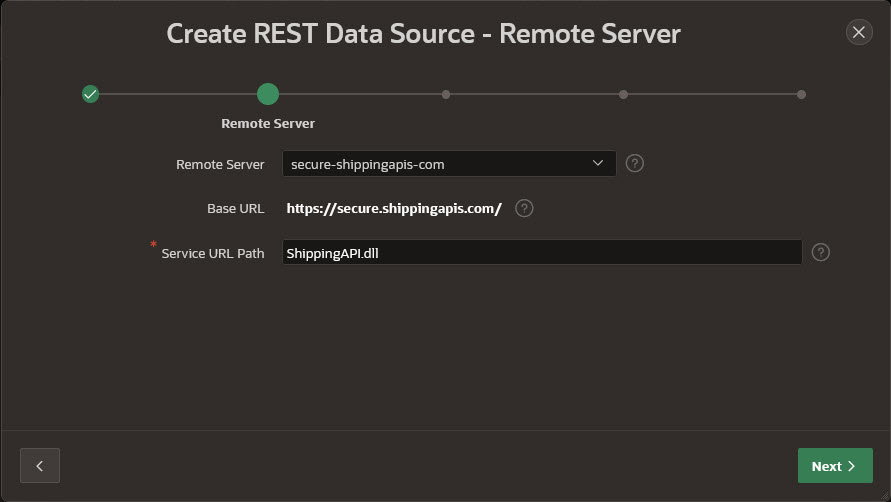
- Click Next > to accept Remote Server defaults.
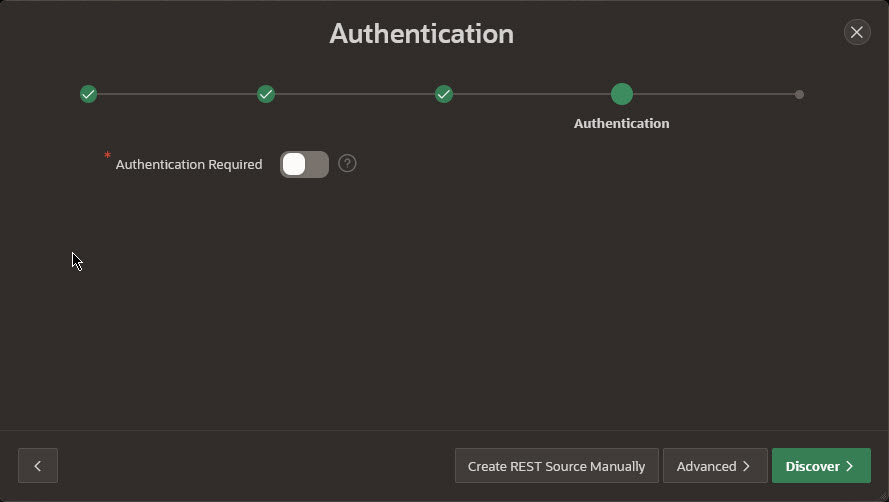
- Click Advanced on the Authentication step, we'll include credentials as part of the XML request payload.
- Now we will prepare sample XML that follows the format and meets all requirements as outlined in the documentation. We will use this to auto-discover the data profile for the response returned by the Address API.
- See here for a full description of the request, this will explain exactly what is required and what the XML request should look like: https://www.usps.com/business/web-tools-apis/address-information-api.htm#_Toc39492053
- Example from the docs:
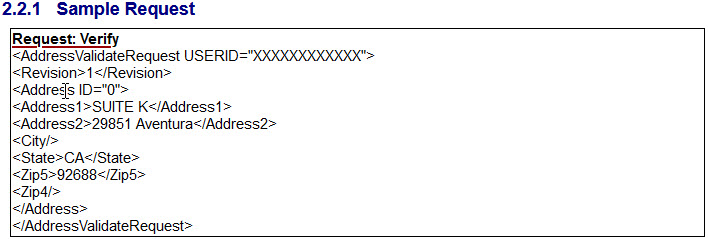
- Don't forget to replace "XXXXXXXXX" with your USERID from the registration email.
- An important detail is that the API allows up to 5 individual <address></address> nodes inside each <AddressValidateRequest>. We will leverage this to pass multiple addresses in our XML request so that APEX can fully discover all available fields.
- Setting the <Revision> property to 1 will return additional data in the response, we will also set this in our sample XML request to let APEX do the heavy lifting for us.
- Here is a sample XML request I've prepared with addresses that will return a combination of all available fields:
<AddressValidateRequest USERID="XXXXXXXXX"><Revision>1</Revision><Address><FirmName></FirmName><Address1>6406 IVY LANE</Address1><Address2>SUITE 100</Address2><City>Greenbelt</City><State>MD</State><Zip5>20770</Zip5><Zip4></Zip4></Address><Address><FirmName>Johnson Manufacturing</FirmName><Address1>SUITE 222</Address1><Address2>500 E MAIN ST</Address2><City>Kansas City</City><State>MO</State><Zip5>64100</Zip5><Zip4></Zip4></Address><Address><FirmName/><Address1>APT 332</Address1><Address2>3158 nw expressway</Address2><City>Oklahoma City</City><State>ok</State><Zip5>73112</Zip5><Zip4/></Address></AddressValidateRequest>
- Add two Query String variable parameters, API and XML, then click Discover >.
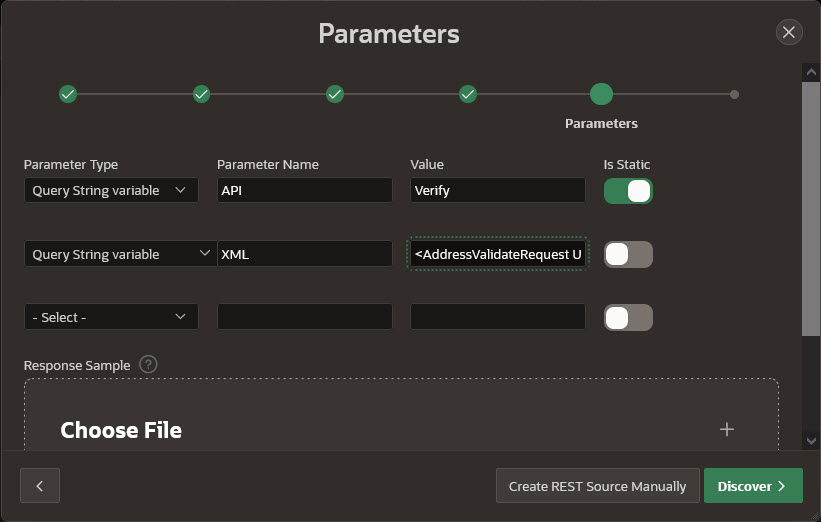
- Parameter Name: API
- Type: Query String variable
- Value: Verify
- Is Static: Switched On
- Parameter Name: XML
- Type Query String variable
- Value: "Sample <AddressValidateRequest> XML from previous step"
- Is Static: Switched Off
- Parameter Name: API
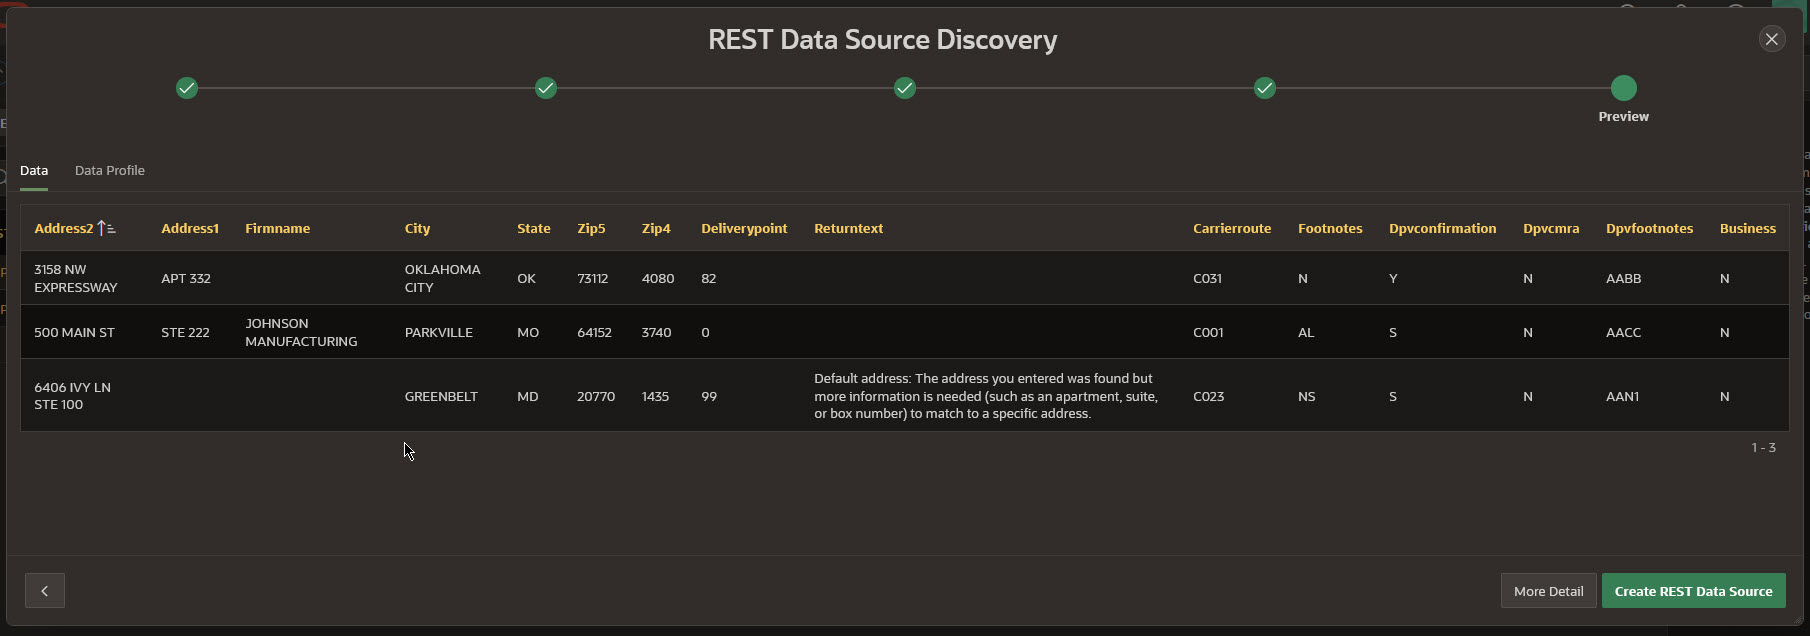
- Review the results of the auto-discovered data profile, it should look like this:
Note: There are two additional columns, CENTRALDELIVERYPOINT and VACANT that aren't shown in the preview, but you can check for them by clicking the Data Profile tab, then scroll down and click Next > to view the last two columns.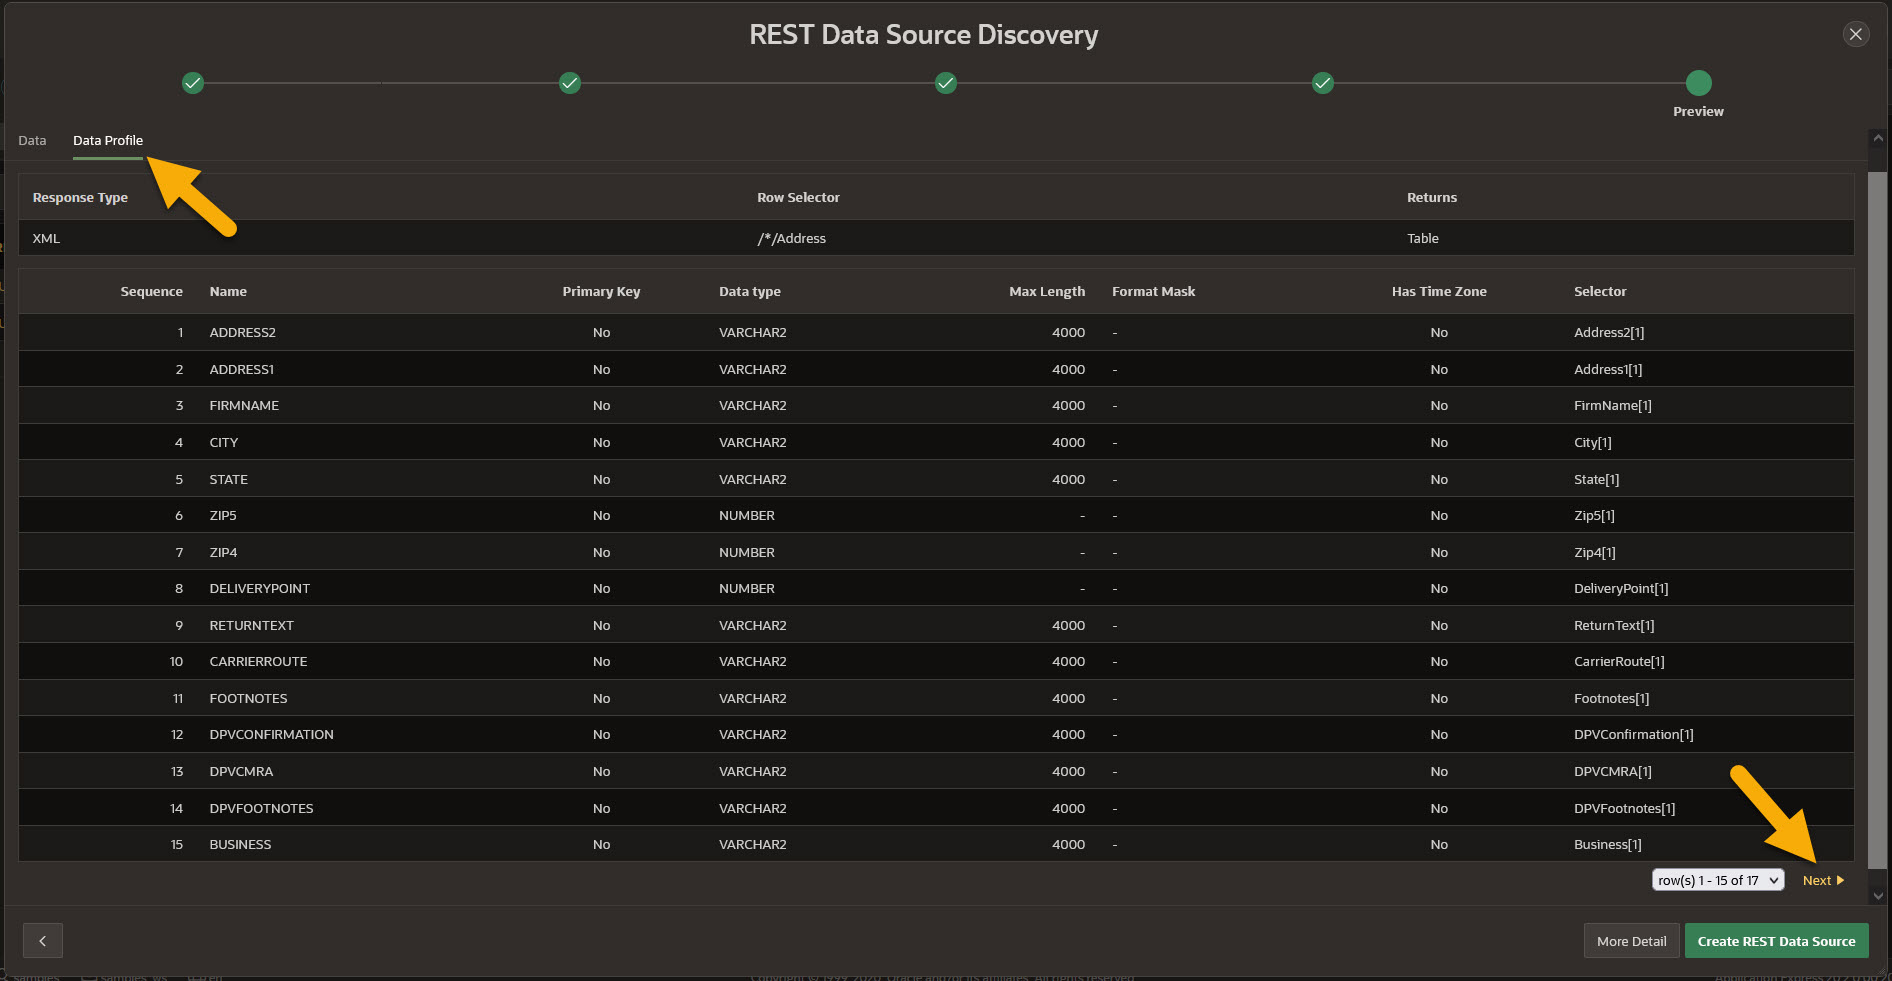

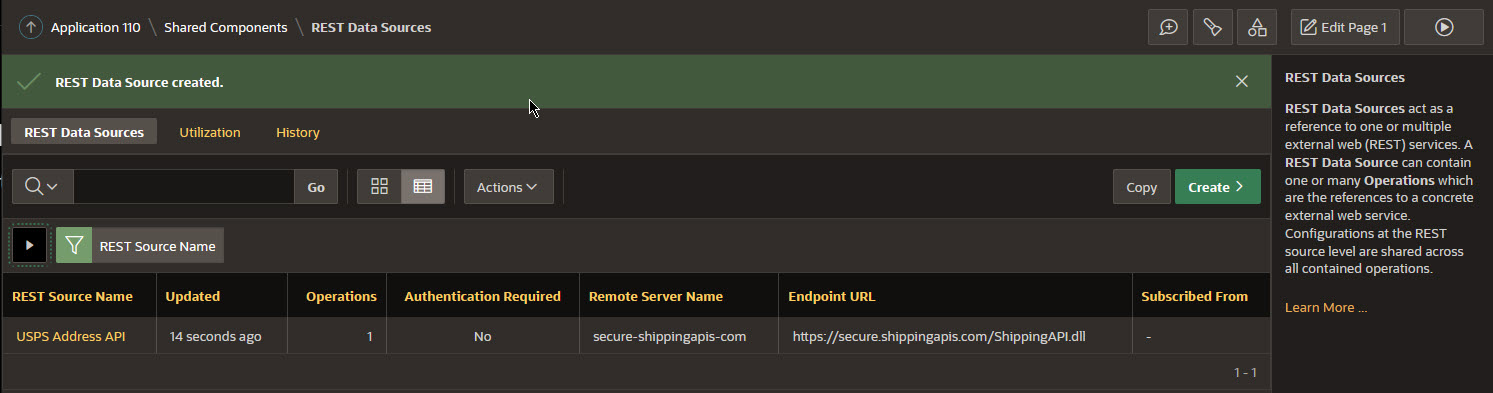
- Finally, click Create REST Data Source to finish. You should now see the USPS Address API listed:
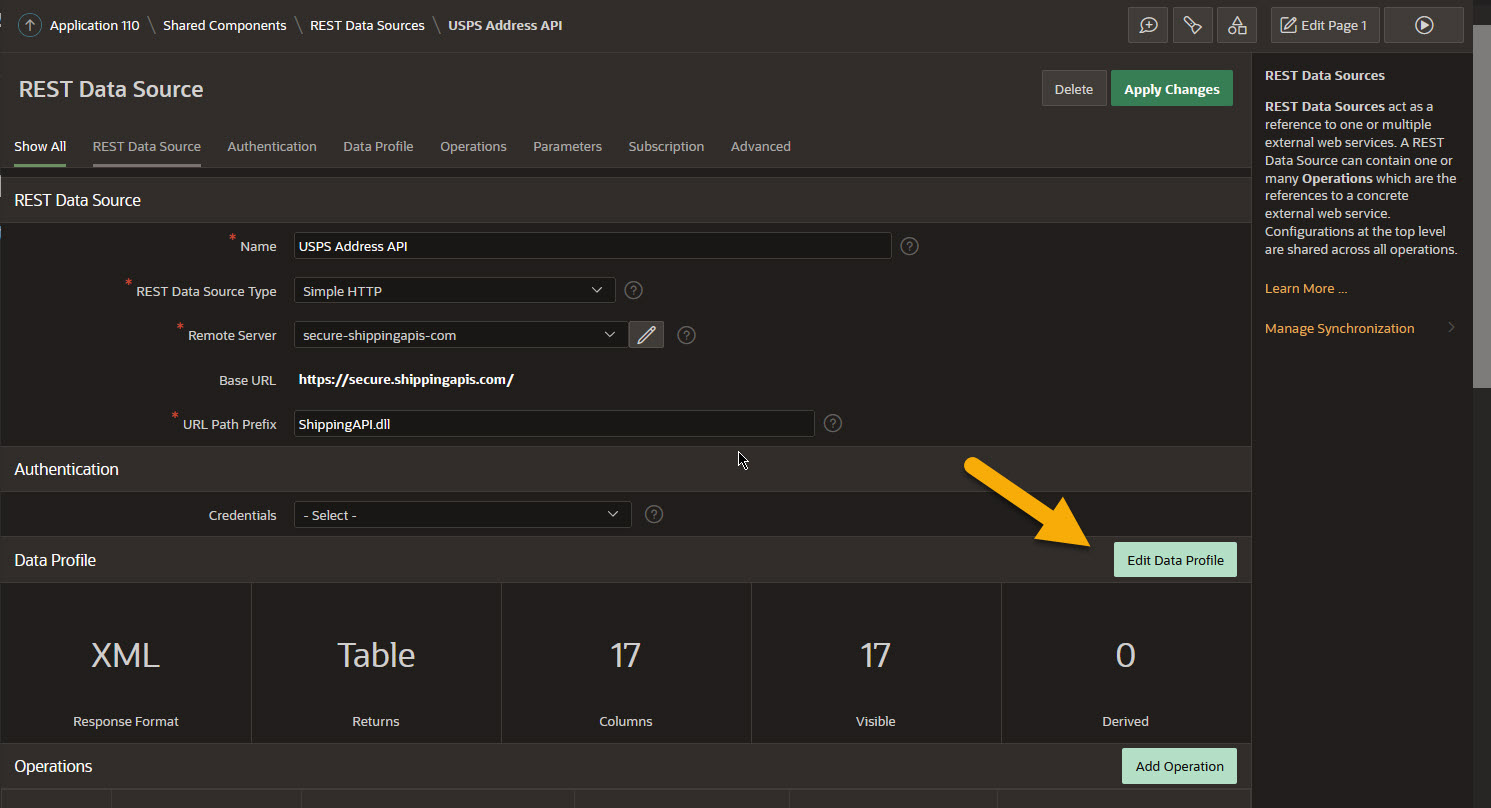
- Click the USPS Address API name to view and edit the REST Data Source properties.
- Then click Edit Data Profile:
- Most of the time, the columns are in the correct order, but if not we can quickly fix that here. Just click Edit, then set the correct sequence number. You can also click Resequence Columns to set the sequence numbers by steps of 10, which will give you enough space between numbers to move them around.
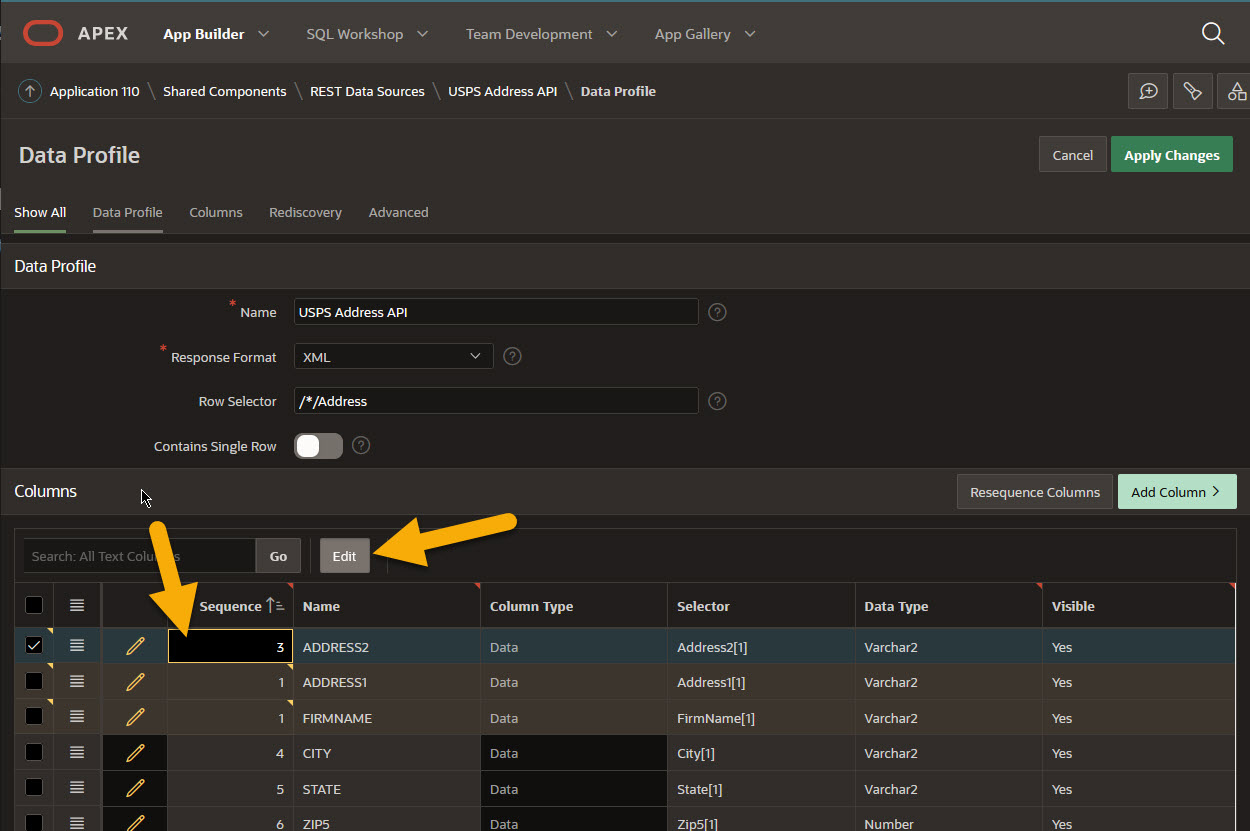
- FIRMNAME should be first, followed by ADDRESS1 and ADDRESS2.
- Next, fix the Data Type for the ZIP5 and ZIP4 columns by selecting Varchar2 from the drop-down list.

- (Reason for this change is that some valid ZIP codes use a leading zero, which will not be stored or displayed correctly if we leave this as a Number Data Type.
- Click Apply Changes at the top of the page to save the new Sequences and Data Type changes to the Data Profile.
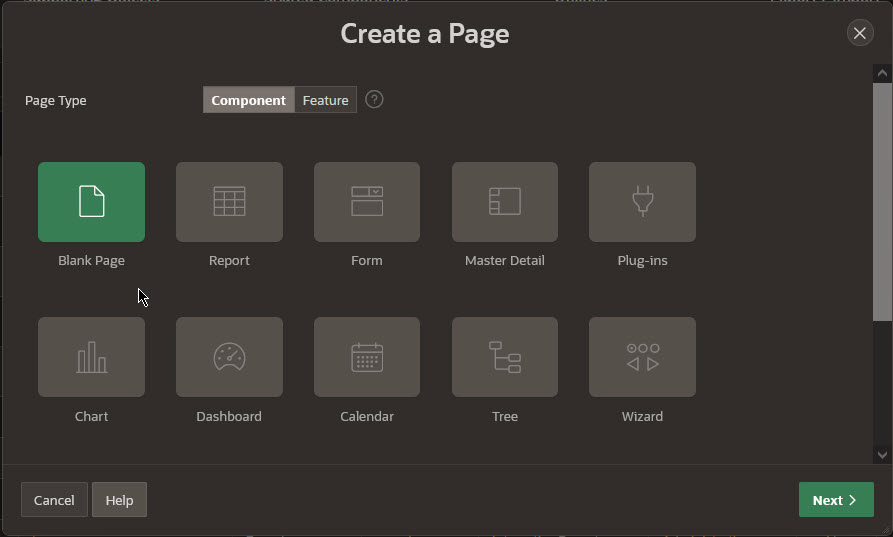
Step 4. Create a new Blank Page and add components
- Create a new Blank Page, later on we will manually add a form component to capture an address and a classic report to show the validated address.
- (Note: You may already have an address form in an existing app that you want to validate, but I encourage you to try this in a new page so you can figure out the best approach to validating you address data.)
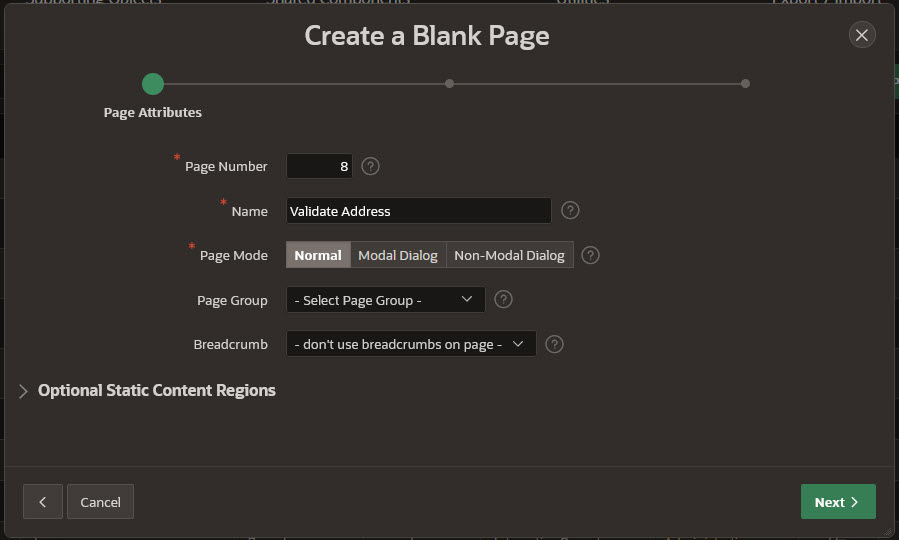
- Pick a page number and enter a Name for the new page, it can be anything that makes sense for your app, such as Enter Address, then click Next >.
- Select a Navigation Menu option that makes sense. For this demo, I chose to Create a new navigation menu entry called "Enter Address," then click Next > and Finish on the final wizard step.

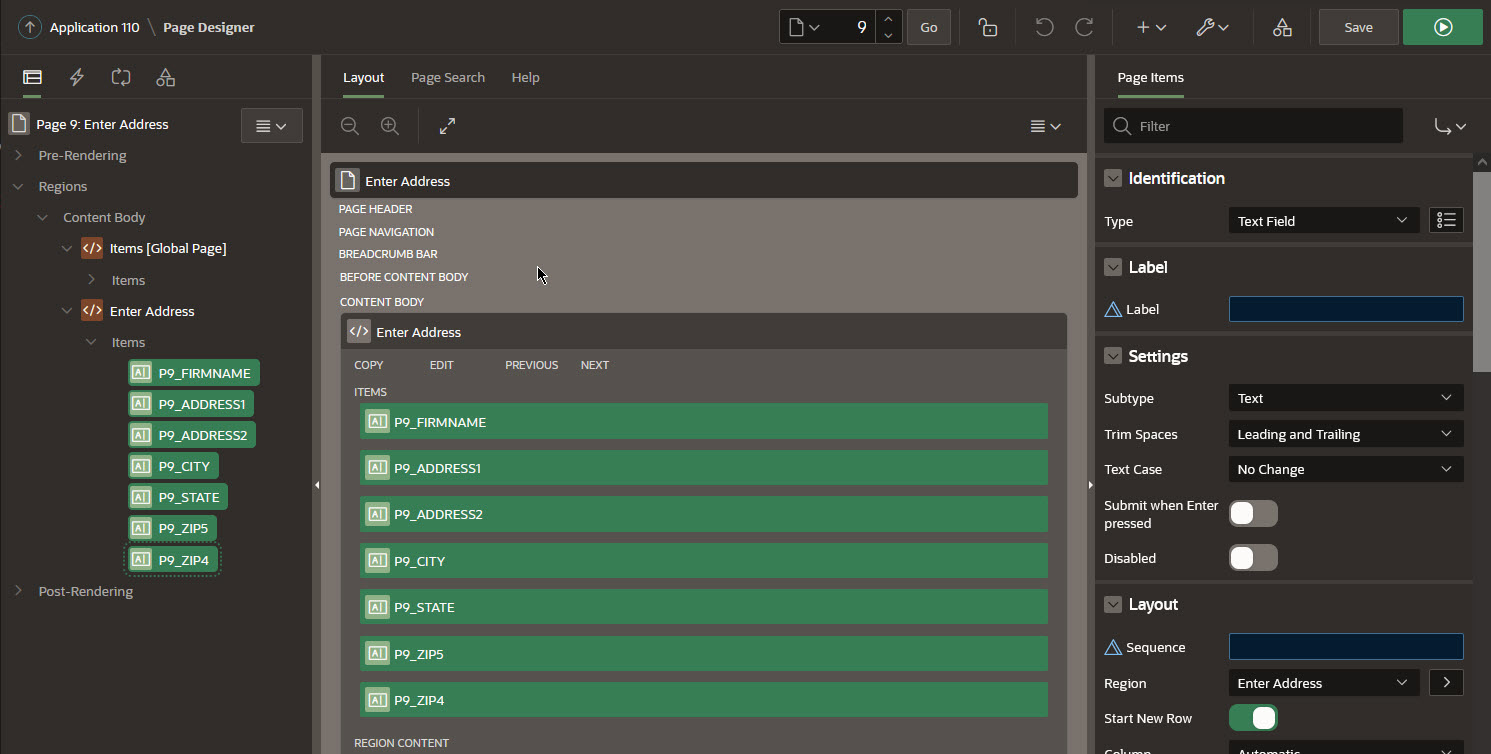
- In your new page, create a new Static Content Region called Enter Address and add the following Text Field items with the listed properties:
- FirmName
- Type: Text Field
- Label: Company
- Template: Optional - Floating
- Address1
- Type: Text Field
- Label: APT/SUITE/BOX
- Template: Optional - Floating
- Address2
- Type: Text Field
- Label: Street Address
- Template: Required - Floating
- City
- Type: Text Field
- Label: City
- Template: Required - Floating
- State
- Type: Text Field
- Label: State
- Template: Required - Floating
- Width: 2 characters
- Zip5
- Type: Text Field
- Label: ZIP
- Template: Optional - Floating
- Width: 5 characters
- Zip4
- Type: Text Field
- Label: ZIP+4
- Template: Optional - Floating
- Width: 4 characters
- FirmName
- Your page should now look something like this:
- Next, add a new Classic Report region to your page called Validated Address with the following properties:
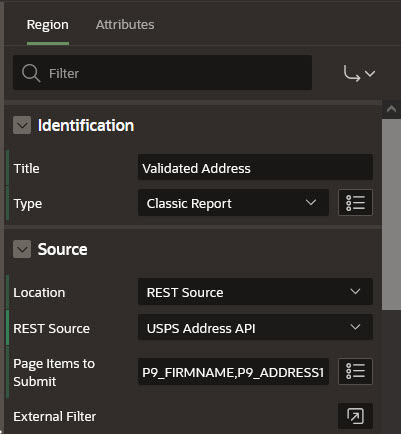
- Location: REST Source
- REST Source: USPS Address API
- Page Items to Submit: All items in the Enter Address Region:
P9_FIRMNAME,P9_ADDRESS1,P9_ADDRESS2,P9_CITY,P9_STATE,P9_ZIP5,P9_ZIP4
- Find the report region on the left sidebar, click the > to expand the Parameters list, and select the XML parameter:
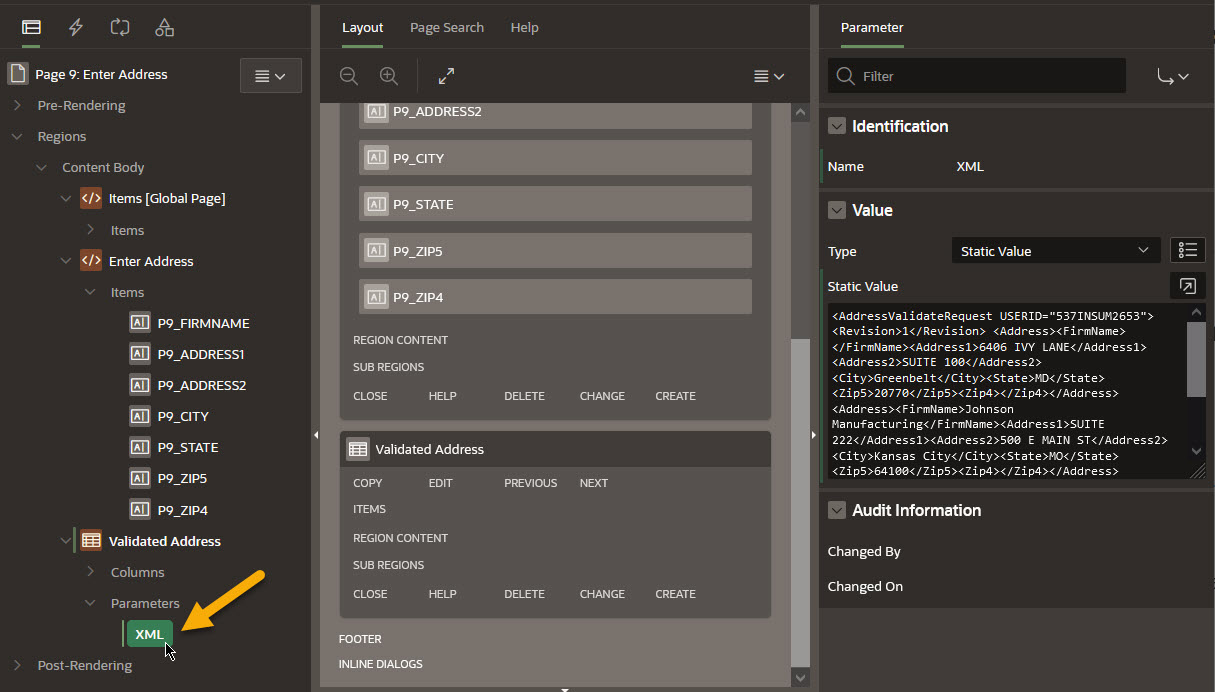
- On the right sidebar, change the Type to SQL Query (return single value) and paste the query below. Don't forget to change the XXXXXXX with your USERID and to make sure the bind variables match your item names accordingly, mine are on page 9 so they're prefixed with P9_.
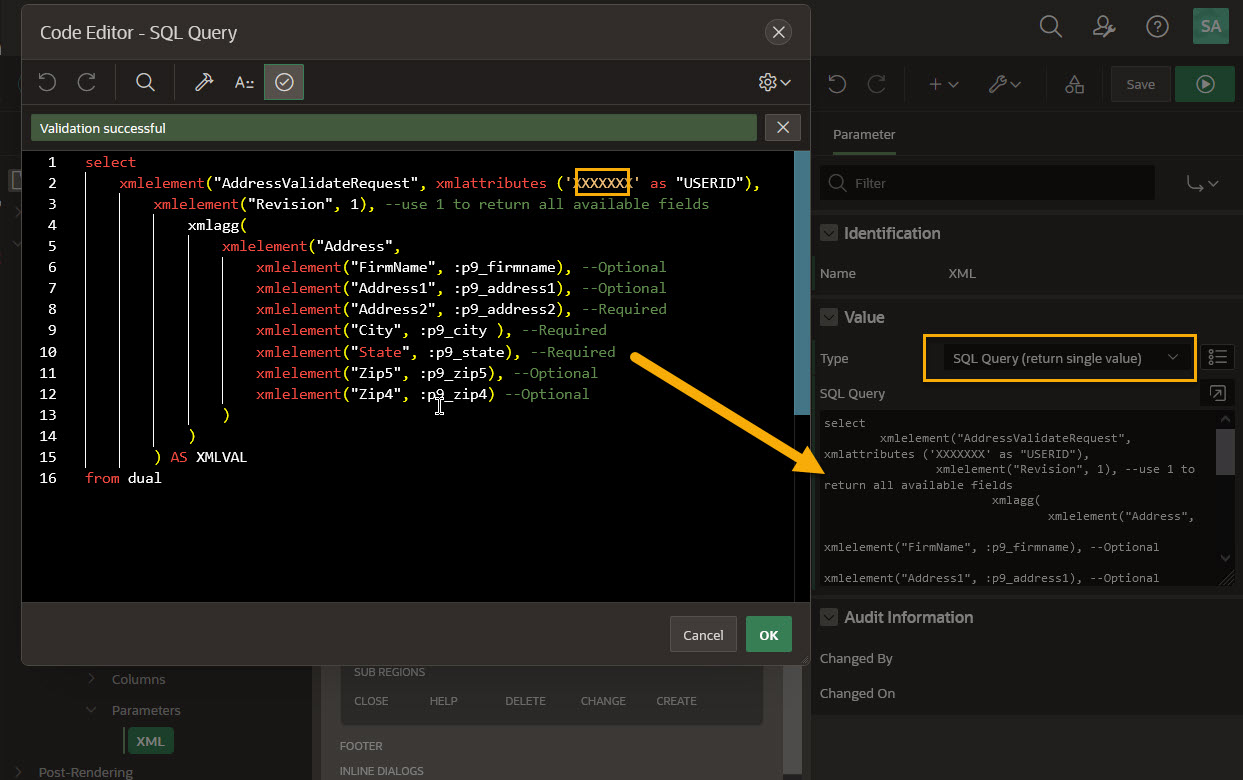
- Example Query:
selectxmlelement("AddressValidateRequest", xmlattributes ('XXXXXXX' as "USERID"),xmlelement("Revision", 1), --1 returns all fieldsxmlagg(xmlelement("Address",xmlelement("FirmName", :p9_firmname),xmlelement("Address1", :p9_address1),xmlelement("Address2", :p9_address2),xmlelement("City", :p9_city ),xmlelement("State", :p9_state),xmlelement("Zip5", :p9_zip5),xmlelement("Zip4", :p9_zip4)))) XMLVALfrom dual Disclaimer: A better practice is to get the USERID from an Application Item that is computed by a stored procedure or function so that the USERID value is stored in the database and not hard-coded into your application, but that is beyond the scope of this article.
- Add a Text[Hot] button to the Enter Address Region with the following properties:
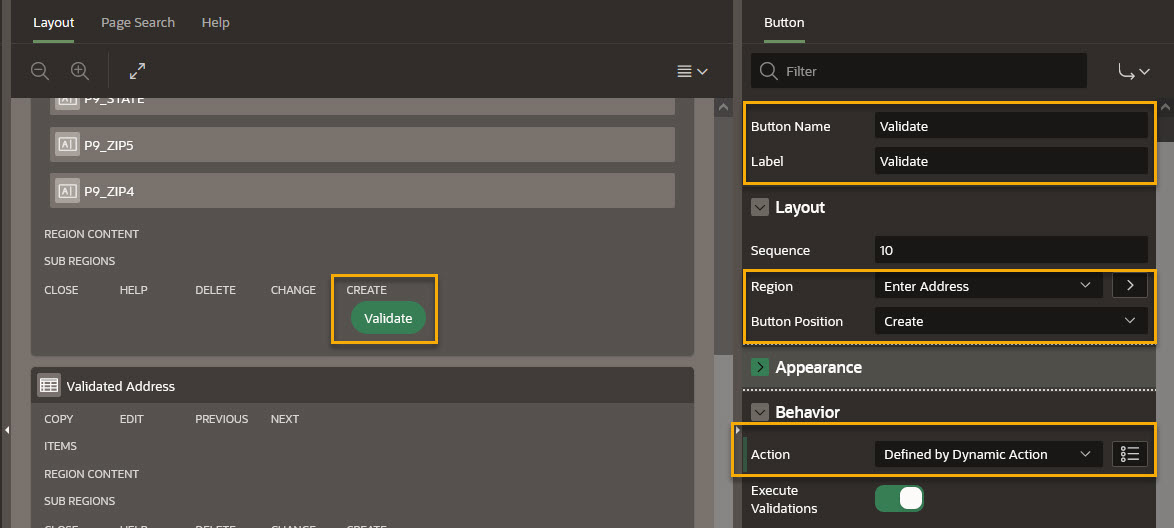
- Button Name: Validate
- Label: Validate
- Region: Enter Address
- Button Position: Create
- Action: Defined by Dynamic Action
- Create a new Dynamic Action with these properties:
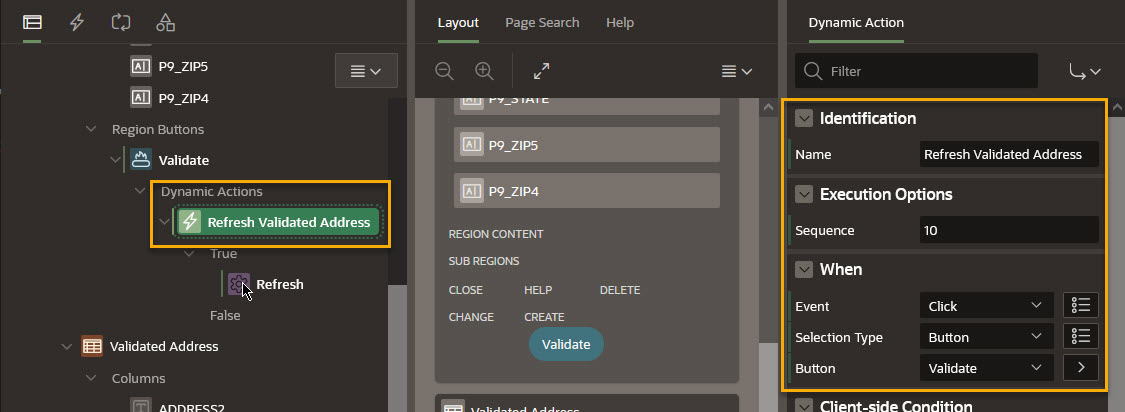
- DA Name: Refresh Validated Address
- Event: Click
- Selection Type: Button
- Button: Validate
- Properties for the True Action:
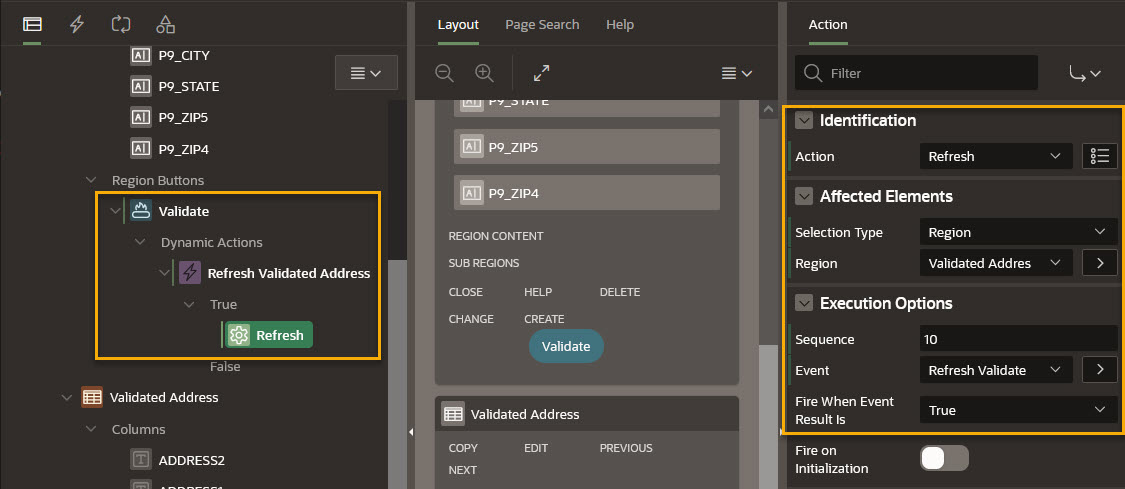
- Action: Refresh
- Selection Type: Region
- Region: Validated Address
- Save and Run the page!
Step 5. Test your page
To test, simply fill out the address form with at least the Street Address, City and State fields, then click Validate. After a short moment, the Validated Address should appear in the bottom region.
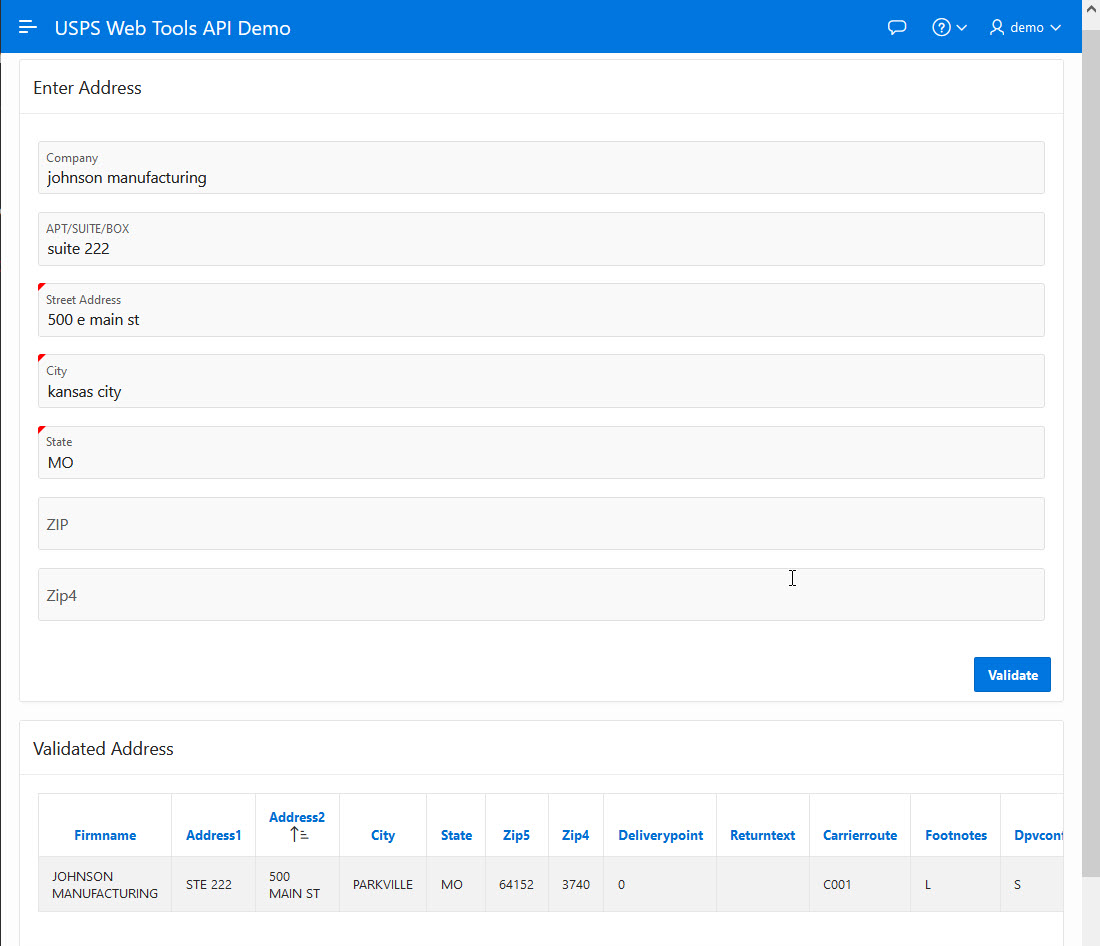
Since our request had Revision tag set to 1, you will see other columns after the ZIP4 field, these columns provide additional information about the validated address that make this integration more powerful than simply using another service such as Google Places Autocomplete. I won't go into all the details of each additional column, but I highly encourage you to read all of the descriptions in the docs:
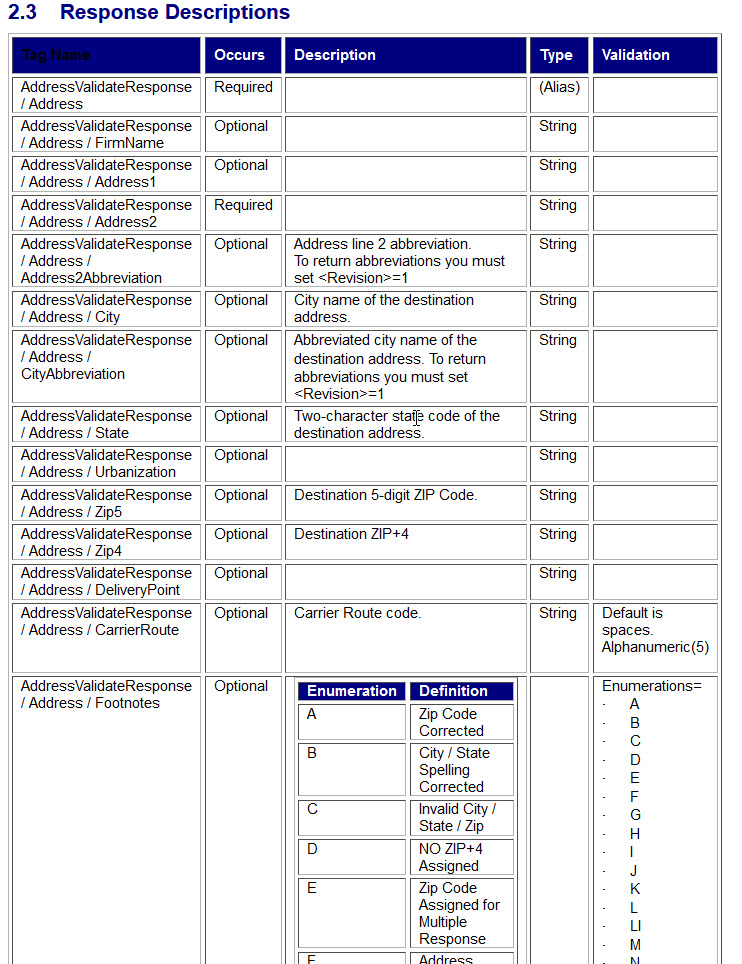
https://www.usps.com/business/web-tools-apis/address-information-api.htm#_Toc39492057
Next Steps
I hope this guide helps readers understand how easy it is to start integrating the USPS Address Validation API into your Oracle APEX applications using simple and declarative options such as REST Data Sources and Dynamic Actions with very little code.
While I don't have a specific number of articles to write on this topic, there are many more ways to use the API and ideas on how to implement them that I want to share with everyone in the coming weeks.
Comments